
To this day, I can’t stress how gorgeous Washington’s Alpine Lake Wilderness area is. This area is perfect for summer days, but note these lakes are far colder than most. However, the best news is they are not only dog friendly, but also don’t require a permit!! I have probably spent a good portion of my summers here for those reasons alone.
Marmot, Jade, and Pea Soup Lake
This is a 26.3-mile round trip there and back trial with 5,712 ft of gain. The elevation gain comes in three separate steep sections with decent breaks in-between. For a regular backpacker, this is no stress. However, if it’s one of your first times on the trial, it will definitely kick you in the butt. I brought two people who were new to backpacking, and though they were at the back of the group, they had no issues getting up, other than requiring more time. We did this in 2 days, although I highly recommend taking three days, so you aren’t as rushed. You will need a NW forest pass for parking at the trailhead and possibly yaktrax/microspikes for getting from Jade Lake to Pea Soup Lake, depending on conditions.
General Itinerary
- Day 1: Drive to Tucquala Meadows Trailhead and hike from the parking lot to Marmot Lake (8.8 miles/2,461 ft elevation gain). Set up camp at Marmot Lake. Multiple spots for tents and large areas for groups. Recommend going off to the right side of the lake for more privacy.
- Day 2: Pack up camp and hike to Jade Lake (1.6 miles/704 ft elevation gain). I recommend getting an early start on the day if you want a decent camping spot. Set up camp and relax around Jade Lake for lunch. Then hike up to Pea Soup Lake for sunset (2.8 miles/1,446 ft elevation gain). Make sure to bring a headlamp, as well as yaktrax/microspikes if there is snow visible on the trial. This portion of the hike can be very slippery if you don’t have some form of traction. Though I have seen people do it with nothing other than hiking shoes and/or poles.
- Day 3: Hike from Jade Lake back to the trailhead (10.3 miles/1,101 ft elevation gain). If you wanted a shorter last day, I recommend spending both nights at Marmot, and doing Jade/Pea soup as a day hike.
Drive
On your drive to Tucquala Meadows Trailhead, disperse camp at one of the many areas off the side of the road leading to the trailhead. Most these areas have established fire pits and dirt patches for tents. You can easily fit 4-5 cars per spot, as well as 3-6 tents (depending on tent size). The road up to the trailhead is pretty bumpy with potholes and washboard. There are also some areas that will fill up with water depending on the rain, but note it is reasonably shallow water. Any car can make it to the trailhead (I drive a Prius and saw many other low clearance cars at the trailhead). There is no service out here, so make sure you have already downloaded AllTrails after signing up to be a member (save 30% with drewadventures30). You will need a NW forest pass for the parking lot.
Day 1
Hike up to Marmot Lake. The initial part of the trek is relatively flat for about 3.5-miles. This portion takes you past Hyas Lake and is absolutely breathtaking. If you are ever looking for a day hike or glamping spot with a little bit of a walk in, Hyas Lake is it. Shortly after the lake, you will begin your climb with the first set of switchbacks. Here you will gain a little over 1,200ft in a little under 2.5 miles. After this, you will have a decent downhill break as you walk through a beautifully peaceful meadow. Finally, you will have about 900ft to gain in a little under two miles. This will bring you to marmot lake! The lake has many different areas to camp. However, if you are a large group, get there early. We had a group of 9 (4 tents) camp to the far right of the trail, near the lake.
Day 2
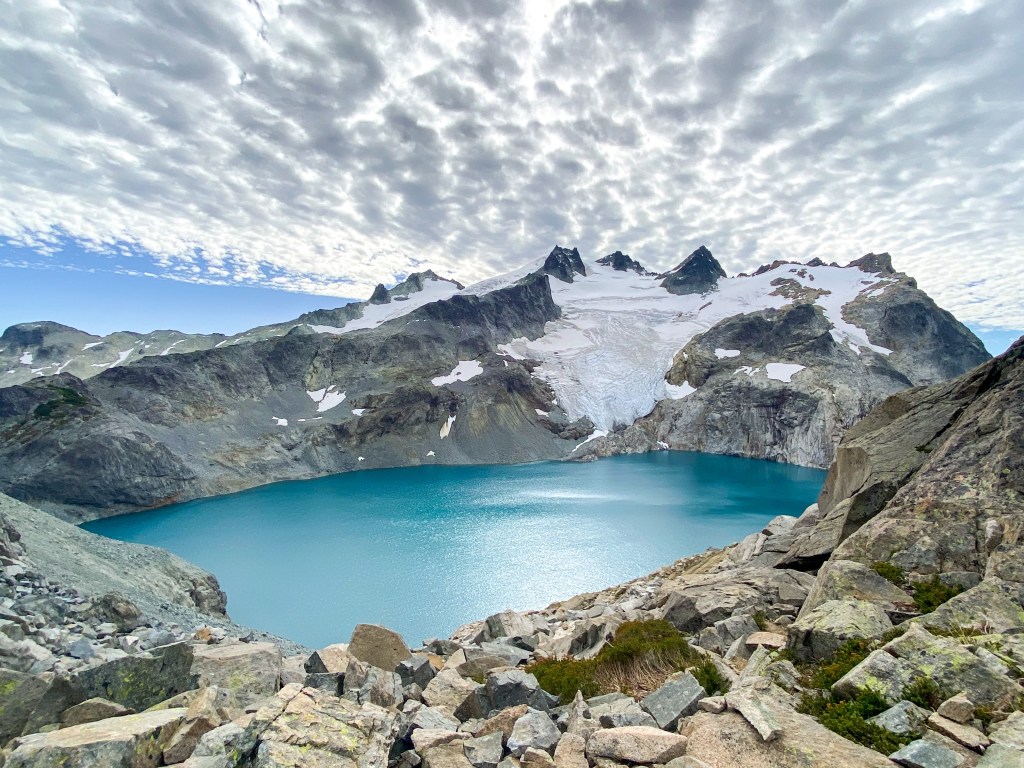
Get an early start and pack up camp. Leave Marmot and hike to Jade Lake. If you wanted to make this a two-day trip, you would have wanted to hike up to Jade on day one. This was our initial plan. However, we were concerned there wouldn’t be any camping spots left up there for a group so large (we were wrong). On the way to the lake, you will gain about another 704ft in a 1.6 miles. You will pass over a small waterfall, that at this point is just a rock field. Follow the cairns, but I highly recommend using AllTrails as well to help guide you. Jade lake is a gorgeous teal blue that will set your spirits on fire. I recommend setting up camp and having lunch. Before doing Pea Soup as a sunset hike. I highly advise you bring yaktrax/microspikes, because you will likely find snow on the final decent up to pea soup lake. This is a climb over a snowy boulder field and can be slippery without traction. If you forgot your yaktrax/microspikes, I recommend at least having hiking poles.
Day 3
If you went for the three-day option. Pack up camp and head back to the trailhead from Jade Lake. You could also spend two nights at Marmot if you wanted a shorter hike back to the car on the last day.
Tuck and Robin Lakes
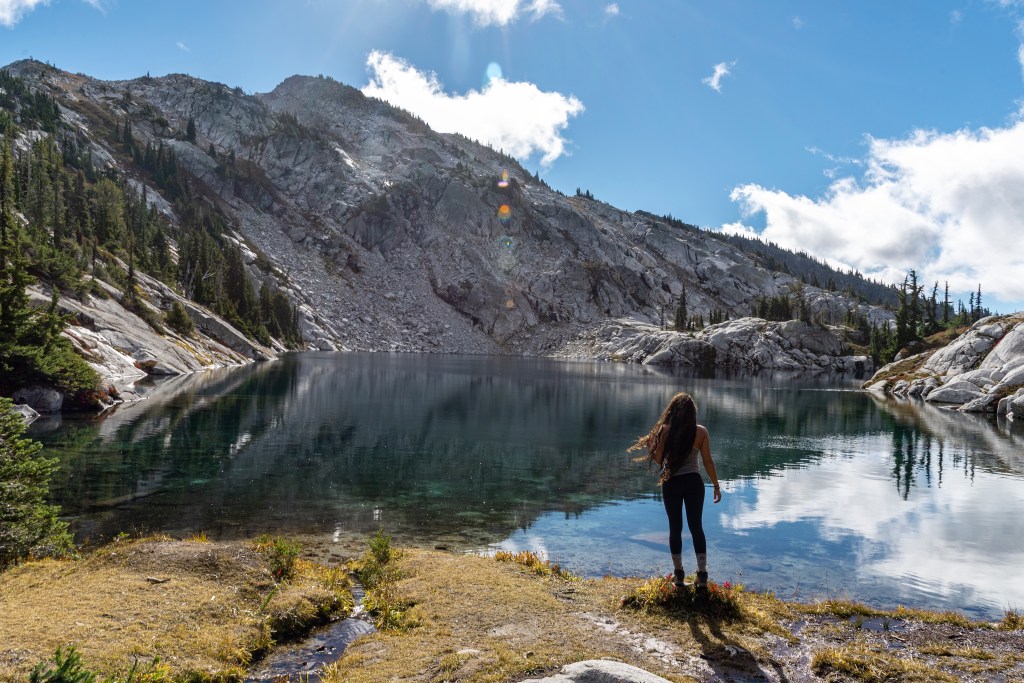
A 12.2-mile there and back trail with about 3,462 ft of elevation gain that is sure to be a sight for sore eyes. This hike starts at the same trailhead as Marmot, Jade, and Pea Soup Lake. Therefore, the hike itself does have some overlapping miles. So, if you were up for a multi-day backpacking trip, this might be a good one to head to while you are coming back down from Jade Lake. If you did tag it on to your prior backpacking trip, this would be excellent practice trail for longer backpacking trips in the backcountry, such as the Wonderland Trail and Grand Tetons Backcountry Loop. However, by itself, it is a great trip for those that would like to have a little extra challenge on their backpacking adventures. I recommend spending 2 nights, so that you aren’t rushed, and can spend a night at both lakes. Camping spots at Tuck Lake are very limited and awkwardly placed, so make sure you arrive early enough to find something.
General Itinerary
- Day 1: Drive to Tucquala Meadows Trailhead. Hike from the trailhead to Tuck Lake (5 miles/2,097 ft elevation gain) and set up camp. I recommend staying higher up with an overlook, so you can see the sunset. Rather than trying to find a camping spot at the lake.
- Day 2: Pack up camp and head to Robin Lake (1.1 miles/1,074 ft elevation gain). I recommend finding a camp spot to the right most edge of the lake. This is a beautiful area to watch the sunset/sunrise over the lake, while also watching it hit Mount Daniel close up. If the weather is warm enough, I highly recommend cowboy camping for star gazing.
- Day 3: Pack up and head back to the trailhead. (6.1 miles/291 feet of elevation gain)
Drive
See Marmot, Jade, and Pea Soup Lake for information on drive. For this backpacking trip we stayed in a local Airbnb along the way that had a hot tub. You will need a NW pass for the parking lot.
Day 1
Make sure to get an early start if you wish to camp at Tuck Lake. To begin, you will continue on the same trail as you did for Marmot Lake. You will trek through the relatively flat portion (~3.5 miles) that will bring you past Hyas Lake. From here you will start your climb up the same switch backs as before. However, you will only stay on these same switch backs for about half a mile. Here you will come across 3 signs on a tree. You will take a right off of the deception pass trail that you have been hiking up, onto Robin lakes trail. If you chose to add this to your Marmot backpacking trip, this would be the start to your next backpacking location. From here the climb continues at a steady incline. Once you reach Tuck Lake, I recommend you camp higher up on the rocks, so that you can enjoy the sunset and overlooking views.
Day 2
Pack up camp and head to Robin Lake. At this point, I highly recommend having AllTrails out until you reach a clear pathway up. This lake is gorgeous from above with Mount Daniel in the background. We camped on the far outer right side of the lake, closest to the cliff edge. This allows for beautiful views of the lake, as well as the mountains and valley. Here you will notice that AllTrails keeps going. This is an optional overlook that would give you a view of Robin Lakes from above. If you had the time, this would be a lovely sunset location. However, if not, I would say you would be more than satisfied by exploring the area around Robin Lakes.
Day 3
Pack up camp and head back down to the trailhead. Remember this is a steady decline, so be prepared for it to take a minute to get back to the car.
Necklace Valley and Tank Lakes
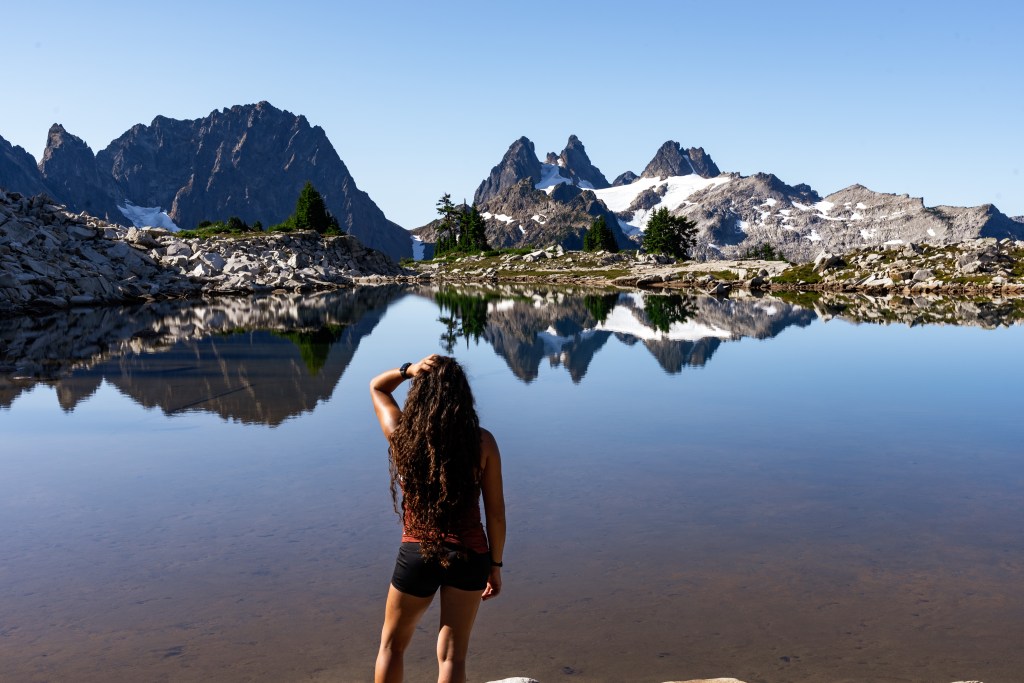
When I say I saved the best for last, I mean it. This hike had my jaw to the ground. Didn’t hurt that we pulled up right as the sun was setting too. Absolutely breathtaking! However, not for the faint of heart. This hike definitely puts your skills and endurance to the test. This is a 19.4 mile there and back trail with 4,960 feet of gain. Once at the top there are so many side hikes in the area you can do for further exploring. Unfortunately, we were in a rush for this hike, so we didn’t get much exploring in, but I will definitely be heading back. I recommend spending 2-3 days at Tank Lakes.
General Itinerary
- Day 1: Drive to Necklace Valley Trailhead. Hike from the trailhead to Tank Lakes (9.7 miles/ 4,531 ft elevation gain). I recommend trying to get there as early as possibly, so that you can get a camping spot near the lake and watch the sunset.
- Day 2/3: If you opted for the longer trip, spend these days exploring the area around Tank Lakes. I recommend day hikes to Iron Cap, La Bohn peak, Northern Tank Lakes, Bears Breast Mountain, La Bohn Gap, Dutch Miller Gap, Williams Lake and Otter point. Possibly make a trip out to La Bohn Lakes as well or make a detour there on your way back to the trailhead.
- Day 4: Pack up camp and head back to the trailhead with a possible detour to La Bohn Lakes.
